Immunizations to pediatric patients can be administered from the this section.
To record a pediatric patient’s immunizations details:
| 1. | In the charting elements ribbon, click Immunizations. The Immunizations screen opens. |
| 2. | Based on the patient’s age, the “Pediatric” tab appears by default to record the immunization details. |
Understanding the screen before starting working on the Pediatric Immunizations:
| • | Tabular View: The tabular view of immunizations brings you the summary of administered, history, refusals, and due vaccinations. |
| • | Identification Based on Background Colors: Based on their colors, immunization statuses can be identified such as Received, History, Due Now, Overdue, Invalid/Refused, and Future. Legends for different background colors are displayed on the top on the Immunizations chart. |
| • | Due/Overdue Immunizations: |
| o | Overdue immunizations can be quickly identified with red strip color. |
| o | Due or Overdue immunizations are displayed on the top to give you a clear view on the due vaccinations. |
| o | Once the immunization details are recorded, they appear at the end in the grid. |
| o | The system records the immunization details up to 5 doses. You can add more doses from the last column in the grid, if required. |
| o | Some patients may be allergic to specific immunizations. You can record the adverse reactions for such patients, which can alert the pediatrician who administers the vaccinations. |
| o | Based on the configuration settings, the system restricts the user when trying to administer the vaccinations before or after the scheduled date; however, you can supersede the configuration settings by selecting the Booster Dose check box. |
| • | Unscheduled Vaccinations: Unscheduled vaccinations can be recorded separately and can be displayed at the end in the grid (below the scheduled vaccines) on the Immunizations screen. |
| • | Reference Material: The recommended immunization schedule for patients aged 0 through 18 years and the catch-up immunization schedule for patients aged 4 months through 18 years are always available on the top on the Immunizations screen as a Reference Material link. |
| • | Identifying Overdue, Due, Next Due, and Recorded Immunizations: |
| o | When the current date exceeds the scheduled date of immunization, the corresponding dose column displays the caption as “Overdue on <scheduled immunization date>.” |
| o | If the current date is same as the scheduled date of immunization, the corresponding dose column displays the caption as “Due Now.” |
| o | When the scheduled date of immunization is in future, the corresponding dose column displays the caption as “Next Due on <scheduled immunization date>.” |
| o | Once the immunization details are recorded, the corresponding dose column displays the date when the vaccination was administered, name of the administered vaccination, provider’s name, and the patient’s age when the vaccination was administered. |
| • | Recording immunization details for pediatric patients reaching adulthood: |
| o | When the patient reaches the 19th birthday, the system will consider the patient as an adult. |
| o | When the patient is a pediatric patient, the user will be able to record immunization details on the Pediatric tab. Once the patient becomes an adult, the immunization details can be recorded from the Adult tab. |
| • | Next Dose Calculation: The next due dose for each vaccination has been calculated as per the CDC rules. |
| 3. | In the tabular format shown in the Pediatric tab, immunization categories are displayed in the far left columns, and the dose numbers are displayed row-wise respective to each immunization category. |
| 4. | The boxes in the grid help you to identify overdue, due, and next due doses for each category. |
| 5. | To administer the dose for an appropriate vaccine, click in the corresponding box. |
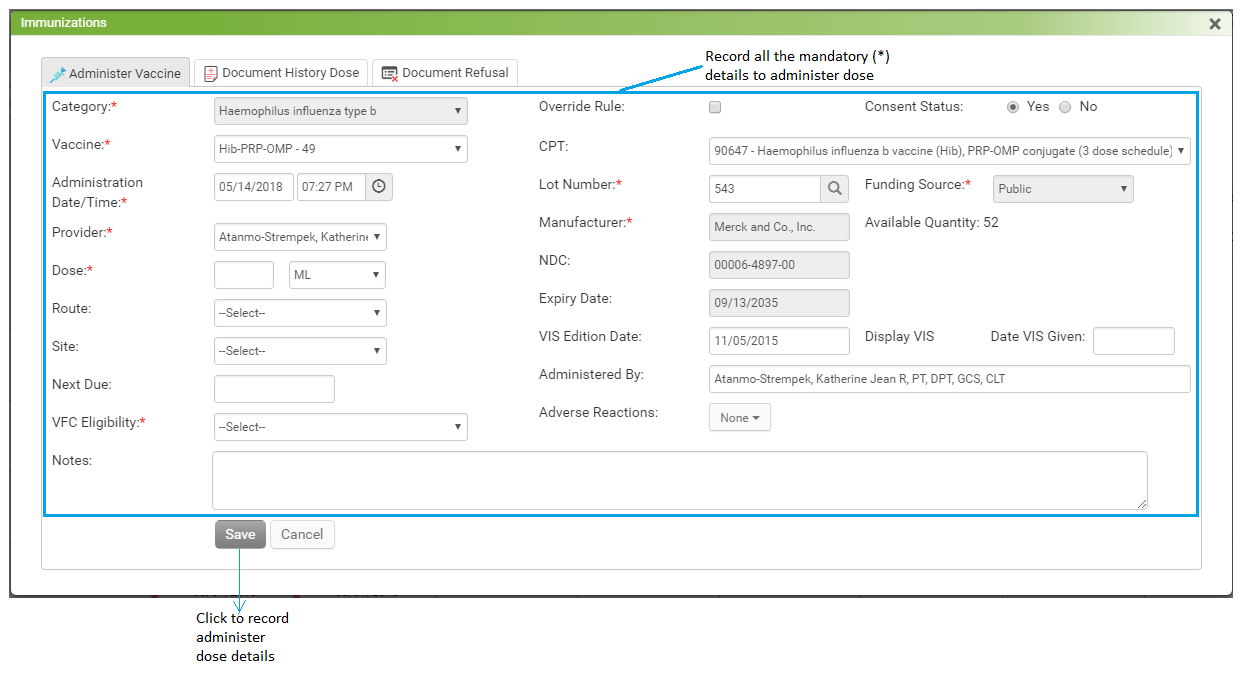
| 6. | The Immunization screen appears with the Administer Vaccine tab selected. |
| 7. | In the Administer Vaccine tab, record the following details: |
| • | Category: This field is prepopulated and will remain in the disabled mode. |
| • | Vaccine: Select the vaccine that is administered to the patient from the drop-down list. This is a mandatory field. Correct Vaccine will be selected by default based on the CDC recommendation. |
| • | Administration Date/Time: The date and time are auto-populated. If required, change the date and time on which the vaccination was administered to the patient. This is a mandatory field. |
| • | Provider: The provider name is auto-populated. If required, change the provider who administered the vaccine to the patient. This is a mandatory field. |
| • | Dose: Enter the dosage quantity of the administered vaccine and select the unit (e.g., “mg”) from the drop-down list. This is a mandatory field. |
| • | Route: Select the route through which the vaccine is administered. |
| • | Site: Select the site through which the vaccine is administered. |
| • | Next Due: Select the next due date for the vaccine. |
| • | VFC Eligibility: Select the VFC Eligibility from drop down list. This is a mandatory field. |
| • | Adverse Reactions: If the patient is allergic to a specific vaccination, you can record the adverse reactions. Double-click the reaction to select it. Recorded reactions will appear in the tool tip upon moving mouse over the recorded immunization on the chart and also on the Encounter note. |
| • | Override Rule : Select this check box to override the configured vaccine rule. If you select this check box, the system will supersede the defined rules while saving the record. |
| • | Consent Status: Select the consent status as Yes or No. |
| • | Lot Number: Select the lot number using the magnifying glass icon. You can also configure the lot details using this icon. Once the lot number is added in the system, you do not have to select it again when giving the same vaccination to another patient, unless the lot is exhausted or expired. The available quantity of vaccines is displayed in the parenthesis if there is only one lot configured for that particular vaccine. This is a mandatory field. |
| • | Manufacturer: This field is prepopulated based on the lot number selection. |
| • | Expiry Date: This field is prepopulated based on the lot number selection. |
| • | NDC: Enter the national drug code number. |
| • | VIS Edition Date: The Vaccine Information Statement (VIS) date that is printed on the statement at the end will be prepopulated in this field. You can also change the VIS Edition Date as per your need. |
| • | Date VIS Given: Enter the date when the VIS was provided to the patient. Select the VIS Given check box to display current date in this field. |
| • | Administered By: By default, the logged-in user name is displayed in this field. You can type in the name of the person who administered the vaccine to the patient. |
| • | Notes: Type in the notes, if any. These comments will appear in the tool tip upon moving mouse over recorded immunization on the chart. |
| 8. | To save the administered immunization details, click Save. |
Notes:
| • | To view the complete list of administered doses, click the  icon next to the vaccine name. This icon is displayed only when the number of administered doses is more than 5. icon next to the vaccine name. This icon is displayed only when the number of administered doses is more than 5. |
| • | The Administered Dose is displayed on the Encounter note only when the administered date and visit date are the same. |
| • | Click Add More Dose to record more than 5 doses. |
| • | Once an immunization dose is saved, the user can edit the details by clicking the recorded dose in the Immunization grid. |
| • | Once an immunization dose is saved and submitted to the registry, the user will not be allowed to make any changes on the Immunizations screen. |
| • | To refer to the immunization reference material, links are provided on the top right corner on the Immunizations screen. |
| • | The vaccinations for which rules are not configured in the system are known as unscheduled vaccinations. To record the unscheduled vaccinations, click Unscheduled Vaccines. |
| • | To generate the Vaccine Administration Report along with voided doses, click View Report. |
| • | To submit all the immunization records to the state registry at once, click Submit All. |
| • | Once reviewed by the provider, select the Reviewed by check box. Your name will display as a reviewer along with date and time. You can modify the date and time as well. |