InSync users can search the previously generated claims by using the Search Claim feature located at the bottom of the New Charge screen.
The Search Claim feature allows providers to search for claims by any one or more of the following: DOS, Submission Date, Visit Date, Patient Name, Claim Number, Facility, Payer, Claim Status/Attribute, Provider, Charge Type, Encounter Status, MRN, Worked Status, Error Severity, Service Provider, and Invoice number.
To search for a claim:
| 1. | Enter or select the From and To DOS using the Calendar icon. |
| 2. | Select Facility to include from drop-down list. |
| 3. | Select Providers to include from drop-down list. |
| 4. | Enter or select the From and To submission dates using the Calendar icon. |
| 5. | Select Claim Attributes to include from drop-down list. |
| 6. | Select Charge Type to include from drop-down list. |
| 7. | Enter or select the From and To Visit Dates using the Calendar icon. |
| 8. | Select Claim Statuses to include from drop-down list. |
| 9. | Select Encounter Statuses to include from drop-down list. |
| 10. | Enter the patient category from the drop-down list. |
| 11. | Enter the claim number(s). |
| 12. | Select Payer to include from drop-down list. |
| 13. | Select Superbill status to include from drop-down list. |
| 14. | Enter the patient name or select using the magnifier icon. |
| 15. | Select the Worked Status. |
| 16. | Select the Responsibility from the drop-down list. |
| 17. | Select the appropriate option from the Balance drop-down. |
| 19. | Select the Eligibility Status from the drop-down list. |
| 20. | Select the "Show only charge(s) falling within filing limit " check box to include charge falling within defined limit. |
| 21. | Enter the Filing Limit Alert Days. |
| 23. | Select the Aging Method from the drop-down list. |
| 24. | Select Aging from drop-down list. |
| 25. | Search the Billing Type by selecting an appropriate option from Both, UB04 (Institutional), and HCFA (Professional). |
| 26. | Select the Error Severity statuses to include from drop-down list. |
| 27. | Select "Marked as Processed Claim(s) Only" to include processed claims. |
| 28. | Select the "Show Void Claim(s) Only" check box to include only void claims. |
| 29. | Enter the number to filter the claims by entering Invoice number. |
| 30. | Enter the invoice number. |
| 31. | Select Hold Reason from the drop-down list. |
*To configure the reasons. Type in ‘rule’ in smart search box on top left corner of your screen and select ‘Rule Hold Reason” option. Once you configure the reasons, just place the cursor in the Hold Reason box, and you will see a list of reasons that you have configured.
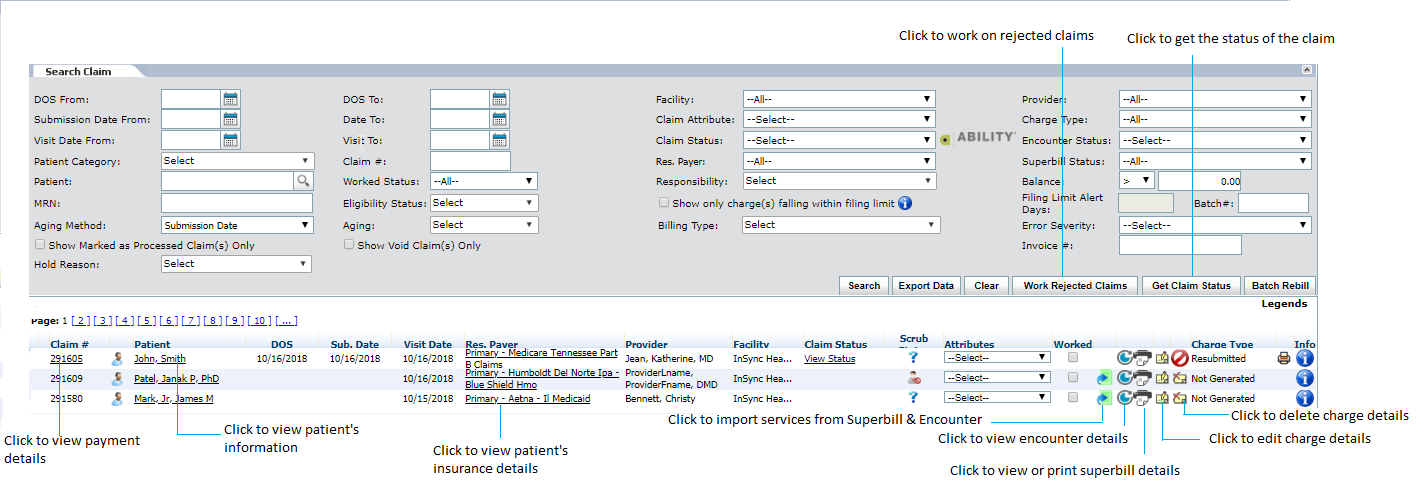
Claim information will display in the window below. Click the blue heading link to sort the results by that heading. Clicking different underlined parts of the claim listing will bring the user to the following screens:
| • | Patient Name – Patient Demographics |
| • | Claim # – Payment Details |
| • | Payer – Insurance Details |
From this screen, InSync users can take the following actions by clicking the following:
| • |  – Import from Superbill & Encounter – Import from Superbill & Encounter |
| • |  – Encounter in progress – Encounter in progress |
| • |  – Import details from Super Bill – Import details from Super Bill |
| • |  – Super Bill; will turn green once information has been entered – Super Bill; will turn green once information has been entered |
| • |  – Edit record; pulls the claim into the top window so user can edit/rework – Edit record; pulls the claim into the top window so user can edit/rework |
| Note: This will re-save and generate the claim, keeping the original claim number. |
| • |  – Delete charge – Delete charge |
| • |  – Print HCFA form – Print HCFA form |
| • |  – To view charge details and additional claim information – To view charge details and additional claim information |
| • |  - To void the charge - To void the charge |
| • |  or or  - To view scrub details - To view scrub details |
Users can check the “Worked” check box next to a claim to indicate (for personal reference) that the claim has been worked by the user. Users can filter by “Worked Status” (e.g., worked, not worked) by using the drop-down menu in the Search Claim screen.
Note: For additional information on claim editing, please reference Correcting/Resubmitting Rejections.
Additional functionality of the Search Claim screen is explained below:
| • | “Batch Rebill” button – allows user to choose claims to rebill after they have already been billed |
| • | “Get Claim Status” button – sweep the system for claim status files returned by the clearinghouse; updates the claim with this information |
| • | "Export Data" button - To export the data into excel file for the selected criteria. |
Note: These functions will be explained in further detail in the Batch Rebill sections.