Additional drugs can be recorded from the Supplementary tab.
To prescribe a supplementary drug:
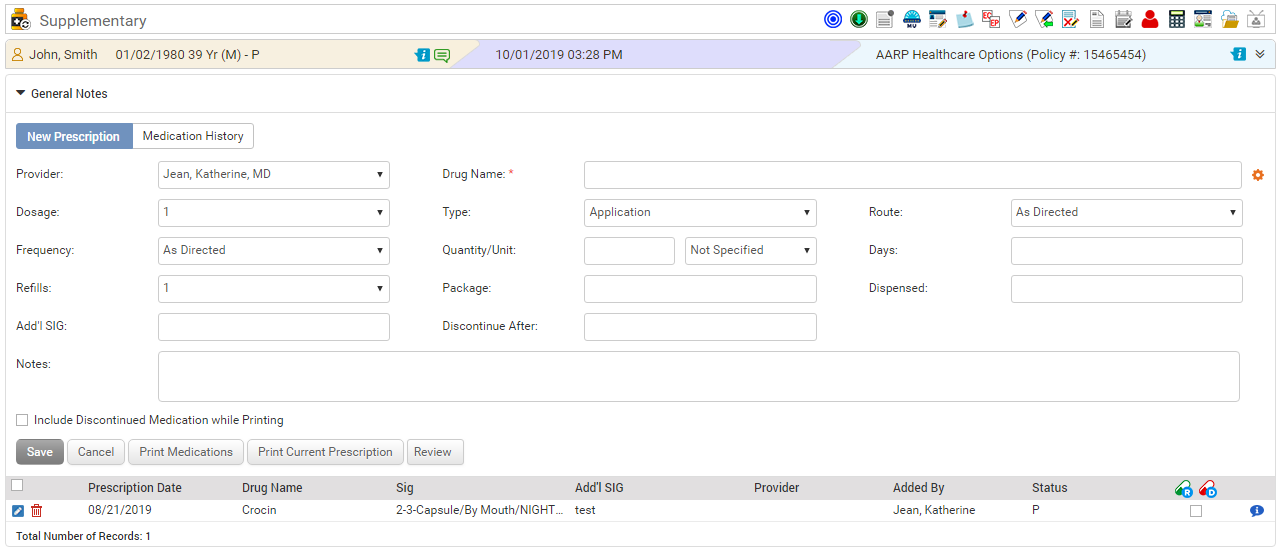
| 1. | In the charting elements ribbon, click Supplementary. The Supplementary screen is displayed. |
| 2. | Record the following necessary details: |
| • | Recorded As: Select the New Prescription or Medication History section. |
| o | New Prescription: Select to record the drug newly prescribed by the provider. |
| o | Medication History: Select to record the drug prescribed by some other provider in the past. After selecting this option, enter the name of the provider who prescribed that drug in the past, and then enter or select the date the drug was prescribed using the calendar icon displayed in the neighboring fields. |
| • | Drug Name: Place the cursor in this field. A list of configured drugs is populated. Select an appropriate drug from the list. The drug names displayed in the list are configured from the Supplementary Drug section in Administration. On selecting the drug, the configured fields are auto-populated. This field is mandatory. |
Note: Click the  icon to configure new drugs. For details on configuration, refer to Supplementary Drug under Administration.
| • | Dosage: Select the dosage quantity from the drop-down list. |
| • | Type: Select the type of intake, such as application, capsule, or drop, from the drop-down list. |
| • | Route: Select the route through which the drug should be taken, such as By Mouth, Ears (Both), or Inhale, from the drop-down list. |
| • | Frequency: Select the frequency of intake, such as Every other day, Nightly, or Bed Time, from the drop-down list. |
| • | Quantity/Unit: Enter the Quantity or Unit of the drug. |
| • | Days: Enter the number of days the drug needs to be taken. |
| • | Discontinue After: If you wish to discontinue the drug after a particular time, select the check box, and enter the date or select the date using the calendar button. |
| • | Refills: Select the refilling value from 1 through 12 from the drop-down list. |
| • | Package: Enter the package details. |
| • | Dispensed: Enter the dispense details. |
| • | Add’I SIG: Enter additional significant details, if any. |
| • | Discontinue After: Select date from the calender to discontinue prescription. |
| • | Notes: Enter the notes related to supplementary drug, if any. These notes are printed on the Encounter note. |
| 3. | Select the Include Discontinued Medications check box to print the discontinued drug details. |
| 4. | Click Save. The drug details are saved and added to the list below. |
| 5. | Click Print Medications to print all the active drug details. |
| 6. | Click Print Current Prescription to print the prescription for the newly added drugs. |
| 7. | In General Notes (Encounter Specific) section, do the following: |
| • | Enter any details related to the drug for the particular visit. These details are printed on the Encounter note. |
| • | Once reviewed, select the provider name from the drop-down list. |
| • | Enter the reviewed date and time or select the date using the calendar icon. |
| • | Click Save to save the details. |
| 8. | To edit the drug details, click the edit icon  . . |
| 9. | To delete the drug, click the delete icon  . . |
| 10. | To renew the drug details, select the check box at the end of that drug entry and click the icon  . . |
| 11. | To discontinue the drug details, select the check box at the end of that drug entry and click the icon  . . |
| 12. | The Status column in the grid is updated as follows: |
| • | C- Current Prescription (Medication History) |
| • | D- Discontinued Medication |