You can download results electronically only when it is configured in your system. Downloading results electronically for labs and radiology is individually configured. Please contact the INSYNC EMR Support for configuration.
To download the results electronically:
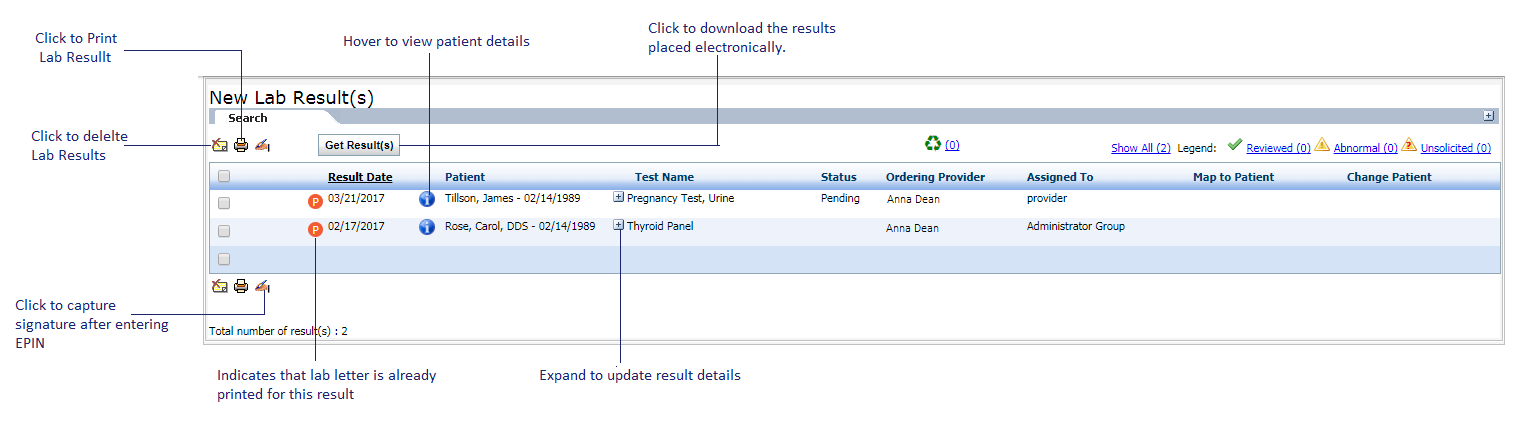
| 1. | On the Results/Orders Queue screen, click the Results tab. The Results tab is displayed with the list of lab results downloaded electronically and recorded manually. |
| 2. | Click Get Result(s) to download the new results. The electronic results are downloaded from the configured labs or radiology. The orders for which the results are downloaded are moved to the Results tab. The updated results can also be seen on the Results panel on the Facesheet screen. |
| 3. | In the Results tab, the downloaded results and results added manually are displayed. Do the following: |
| • | To review the result details, click the icon corresponding to the test. icon corresponding to the test. |
| o | Click on the Test name to view the test details. |
| o | Enter the remarks in Remarks field. Click the icon to add a macro, if configured. For details on configuration, refer to the Macro Configuration section in Administration. icon to add a macro, if configured. For details on configuration, refer to the Macro Configuration section in Administration. |
| o | The Patient Portal Notification check box is displayed only for patient portal users. The check box is enabled and selected only when Patient Portal notification for lab results is configured, and if the status of the result is Reviewed, Completed, or Performed. For details on configuration, refer to the Practice Defaults section in Administration. Once the remarks are added and saved, the patient receives an e-mail notification of the lab result. |
| o | Enter the Notes, if any, and select the Assign To Do from the drop-down list. Once assigned and saved with Notes, the user whom it is assigned to receives a To Do with the notes attached. |
| o | Select options from the drop down to whom you want to assign To Do. |
| o | Select the Status from the drop-down list, if necessary. |
| o | Select the Reviewed by from the drop-down list. |
| o | Click Graph to view the graph based on the observation values. |
| o | Click Result to navigate to the Results screen, where you can add a new result manually, edit an existing result, and delete it. This link is not displayed for downloaded results. |
| o | Select the Diagnostic Result Image check box to electronically indicate the availability of a patient’s image and narrative interpretations for the radiology tests. This check box is displayed only for radiology tests. Selection of this check box is the criteria to increase numerator for “Menu Set 3: Imaging Results” of MU-2. Please refer to the above section in Meaningful Use Stage- 2 User Guide for more details. |
| o | Click the icon to view the electronic image results. This icon is displayed for radiology tests and only if the result is received with external image link. icon to view the electronic image results. This icon is displayed for radiology tests and only if the result is received with external image link. |
| o | Click the icon to view the result in PDF format. icon to view the result in PDF format. |
| o | Click the icon to fax the result. icon to fax the result. |
| o | Click  to view detail trending of the result. to view detail trending of the result. |
| o | Click  to view Lab Letter. to view Lab Letter. |
| o | Click the icon to view the education material. The education material can be exported to PDF, printed, and provided to the patient as well. Providing an education material will help in increasing numerator for “Core 13: Use clinically relevant information from Certified EHR Technology to identify patient-specific education resources and provide those resources to the patient” of MU-2. Please refer to the above section in Meaningful Use Stage – 2 User Guide for more details. icon to view the education material. The education material can be exported to PDF, printed, and provided to the patient as well. Providing an education material will help in increasing numerator for “Core 13: Use clinically relevant information from Certified EHR Technology to identify patient-specific education resources and provide those resources to the patient” of MU-2. Please refer to the above section in Meaningful Use Stage – 2 User Guide for more details. |
| • | Click  to delete selected lab results. to delete selected lab results. |
| • | Click  to print selected lab results. to print selected lab results. |
| • | Click  to capture electronic signature on the lab results after entering EPIN. to capture electronic signature on the lab results after entering EPIN. |
Notes:
| • | Once the results are downloaded electronically, a copy of it will be automatically sent to the NYU HIE through HL7 interface if the patient’s consent is recorded on the Patient Information screen. |
| • | On the Results/Orders Queue screen, select the Category as Radiology from the drop-down list. Click the Results tab and follow similar steps to download the result for radiology tests. |
| • | Receiving a radiology result electronically or manually is the criteria to increase numerator for “Menu Set 3: Imaging Results” of MU-2. Please refer to the above section in Meaningful Use Stage – 2 User Guide for more details. |
| • | Receiving a lab result electronically or manually is the criteria to increase numerator for “Core 10: Incorporate clinical lab test results as a structured data” of MU-2. Please refer to the above section in Meaningful Use Stage – 2 User Guide for more details. |