Configuring Patient Appointment Reminder Feature

Contents
To use the Patient Appointment Reminder feature, you must configure it in your system.
To configure Patient Appointment Reminder feature:
| 1. | From the left menu items, select Administration > Setup > Practice Management. |
| 2. | Click the Practice Defaults link. The Practice Defaults screen opens up. |
| 3. | From the Appointment Reminder Configuration Settings panel, following three sections can be configured: |
| a. | Phone Reminder Setup |
| b. | Email Reminder Setup |
| c. | Text Reminder Setup |
Configuring Phone Reminder Setup
The Phone Reminder Setup section helps you configuring settings such as,
| • | how prior the reminders to be sent to the patient |
| • | the (facility’s office/cell) number that would be displayed on the patient’s phone on receiving your call |
| • | at which time the reminders should be sent |
| • | when the reminders should be resent in case of failure in first trial |
| • | how many times to retry in case of failure |
| • | what would be the message that would be heard by the patient on receiving your call |
It may happen that the patient does not receive call when transmitted. In that case, a voice mail can be sent to the patient. You can configure the voice mail settings under the Phone Reminder Setup section. The below figure is followed by the step-by-step information explaining each field on the screen.
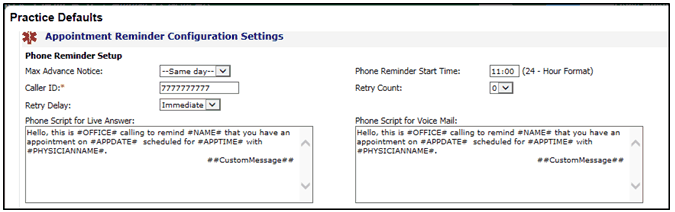
| 1. | In the Max Advance Notice field, select the number of days. You can send the phone reminder either on the same day of appointment or 1-day in advance or 2-days in advance. |
| 2. | In the Caller ID field, type the facility’s phone number. This will be displayed on the patient’s phone on receiving a call from the facility. |
| 3. | In the Retry Delay field, select the time duration to call back again in case of a call failure for any reason. You can either immediately retry, or retry after one, two, or, three hours. |
| 4. | In the Phone Reminder Start Time field, enter the time in 24-Hour format; for example, 10:00 or 23:00 etc. This time will be displayed on the Patient Appointment Reminder screen. |
| 5. | In the Retry Count field, mention how many times the patient should be called in case of a call failure in the first attempt. You can set it up to once, twice, or thrice. If you don’t want to call back after first trial, you can set it to “0”. |
| 6. | In the Phone Script for Live Answer field, type the message that you want the recipient to hear when the call is transmitted. |
Note: Keywords (for example: #OFFICE#, #NAME# etc.) used in the script are preconfigured and must not be changed at all. If required, you should only change the content in the remaining body structure. It is recommended to contact InSync EMR support to make any kind of changes in the script.
In the Phone Script for Phone Mail field, type the message that you want to send as a voice mail when the recipient is unreachable.
Configuring Email Reminder Setup
The Email Reminder Setup section helps you setting up an email message reminder to the patient’s email ID. The below figure is followed by the step-by-step information explaining each field in the screen.
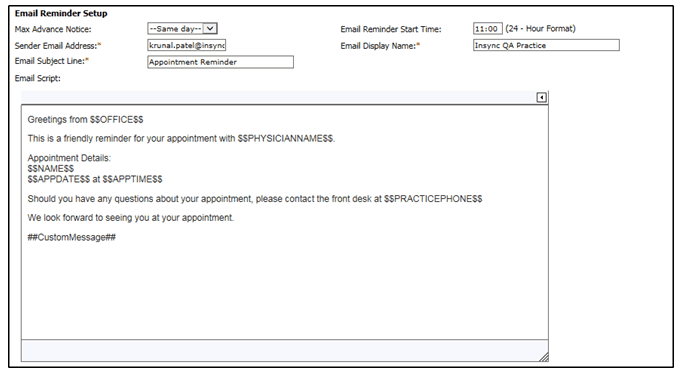
| 1. | In the Max Advance Notice field, enter the number of days. You can send the email reminder either on the same day of appointment or 1-day in advance or 2-days in advance. |
| 2. | In the Sender Email Address field, type the facility’s email address from where an email will be sent to the patient. |
| 3. | In the Email Subject Line field, type the subject line that you want to send in your email, for example, “Reminding about your tomorrow’s visit to our facility.” |
| 4. | In the Email Reminder Start Time field, enter the time in 24-Hour format; for example, 19:00 or 23:00 etc. This time will be displayed on the Patient Appointment Reminder screen on the Schedule Appointment screen. |
| 5. | In the Email Display Name field, type the name to display on the patient’s email when an email is sent to the patient, for example, your facility name. |
| 6. | In the Email Script field, type the email message that you want to send to the patient as a reminder. |
Note: Keywords (for example: $$NAME$$, $$APPDATE$$ etc.) used in the script are preconfigured and must not be changed at all. If required, you should only change the content in the remaining body structure. It is recommended to contact InSync EMR support to make any kind of changes in the script.
Configuring Text Reminder Setup
The Text Reminder Setup section helps you setting up the text reminders to be sent to the patients. The below figure is followed by the step-by-step information explaining each field in the screen.
| 1. | In the Max Advance Notice field, enter the number of days. You can send the text reminder either on the same day of appointment or 1-day in advance or 2-days in advance. |
| 2. | In the Text Message field, type the text to be displayed on the patient’s phone on receiving reminder from the facility. It is recommended to enter text only up to 130 characters. If the text exceeds 130 characters, the text message splits into 2 parts. |
Note: Keywords (for example: #OFFICE#, #NAME# etc.) used in the script are preconfigured and must not be changed at all. If required, you should only change the content in the remaining body structure. It is recommended to contact InSync EMR support to make any kind of changes in the script.
| 3. | In the Text Reminder Start Time field, enter the time in 24-Hour format; for example, 19:00 or 23:00 etc. This time is displayed on the Patient Appointment Reminder screen on the Schedule Appointment screen. |
| 4. | In the Practice Short Name field, type the short name of the practice. This is useful only in case of long practice names as the long name may consume more space in the Text Message field that might result in splitting message into 2 parts. This field is mandatory. If you feel your practice name is not so big, you can use the same name as a short name. |
