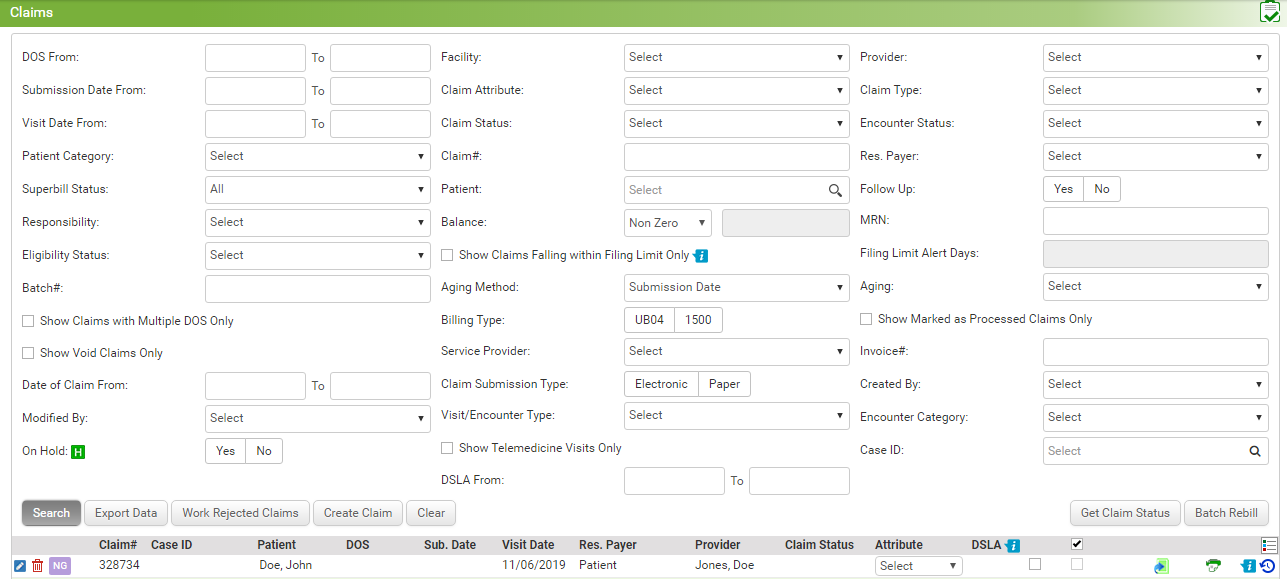
InSync users can search the previously generated claims using the Claims module.
The Claims feature allows providers to search for claims by any one or more of the following: DOS, Facility, Provider, Submission Date, Claim Attribute, Claim Type, Visit Date, Claim Status, Encounter Status, Patient Category, and so forth.
To search for a claim:
| 1. | Enter or select the From and To DOS using the Calendar icon. |
| 2. | Select Facility to include from drop-down list. |
| 3. | Select Providers to include from drop-down list. |
| 4. | Enter or select the From and To submission dates using the Calendar icon. |
| 5. | Select Claim Attributes to include from drop-down list. |
| 6. | Select Charge Type to include from drop-down list. |
| 7. | Enter or select the From and To Visit Dates using the Calendar icon. |
| 8. | Select Claim Statuses to include from drop-down list. |
| 9. | Select Encounter Statuses to include from drop-down list. |
| 10. | Enter the Patient Category from the drop-down list. |
| 11. | Enter the Claim Numer. |
| 12. | Select Payer to include from drop-down list. |
| 13. | Select Superbill Status to include from drop-down list. |
| 14. | Enter the patient name or select using the magnifier icon. |
| 15. | Select the Follow Up Status. |
| 16. | Select the Responsibility from the drop-down list. |
| 17. | Select the appropriate option from the Balance drop-down. |
| 19. | Select the Eligibility Status from the drop-down list. |
| 20. | Select the "Show Claims Falling within Filing Limit Only" check box to include claims falling within defined limit. |
| 21. | Enter the Filing Limit Alert Days. |
| 23. | Select the Aging Method from the drop-down list. |
| 24. | Select Aging from drop-down list. |
| 25. | Select "Show Claims with Multiple DOS Only" to view claims with multiple DOS only. |
| 26. | Select the Billing Type. |
| 27. | Select "Show Marked as Processed Claims Only" to include processed claims. |
| 28. | Select the "Show Void Claims Only" check box to include only voided claims. |
| 29. | Select Service Provider from the drop-down list. |
| 30. | Enter the Invoice Number. |
| 31. | Select the Hold Reason from the drop-down list. |
| 32. | Select the Claim Submission Type. |
| 33. | Enter or select the From and To Date of Claim using the Calendar icon. |
| 34. | Select the Visit/Encounter Type from the drop-down list. |
| 35. | Select the Created By and Modified By from the respective drop-downs. |
| 36. | Select the Encounter Category. |
| 37. | Select the appropriate On Hold status. Click the icon  to view hold claims. to view hold claims. |
| 38. | Select "Show Telemedicine Visits Only" to include claims associated with Telemedicine Visits. |
| 39. | Select Case ID, if required. |
| 40. | Select the DSLA From and To using the Calender. |
| 42. | Click Export Data to export claims data into an excel file. |
| 43. | Click Work Rejected Claims to view the list of rejected claims. |
| 44. | Click Create Claims to create a new claim. |
| 45. | Click Get Claim Status to get the claim status of files returned by the clearinghouse. |
| 46. | Click Batch Rebill to choose claims to rebill after they have already been billed. |
Sorting the search results: You can click the heading link to sort the results by that heading.
Search Results: On the search results grid, you can do the following:
| • | Claim Status:  - Not generated claim, - Not generated claim,  - Generated claim, - Generated claim,  - Self Pay claim, - Self Pay claim,  - Submitted claim, - Submitted claim,  - Void claim, - Void claim,  - Rebuild claim - Rebuild claim |
| • | Click the Claim# link to view payment details for that claim. |
| • | Click the Patient Name link to access other sections, such as Patient Demographics, Patient Financial, Patient Statement, Notes, To Do, and Claim Issue Log. |
| • | To access the insurance details of the patient, click the Payer link. |
| • | To edit the claims details, click the Edit icon  . Upon clicking the Edit icon , system navigates you to the Create Claims screen to update the claim details. . Upon clicking the Edit icon , system navigates you to the Create Claims screen to update the claim details. |
| • | To delete the claim from the list, click the Delete icon  . . |
| • | To view case details, click the Case ID link. |
| • | To perform patient eligibility verification, click the icon  . . |
| • | To import diagnosis and illness codes from the Superbill & Encounter, click the icon  . . |
| • | The icon  indicates the encounter is already started for this patient. Click to view encounter details of that patient. indicates the encounter is already started for this patient. Click to view encounter details of that patient. |
| • | The icon  indicates the encounter is closed for that patient. Click to view the encounter details of that patient. indicates the encounter is closed for that patient. Click to view the encounter details of that patient. |
| • | The icon  indicates the encounter is not yet started for that patient. indicates the encounter is not yet started for that patient. |
| • | The icon  indicates the encounter is closed and co-signed is performed. indicates the encounter is closed and co-signed is performed. |
| • | The icon  indicates the superbill is not yet started for the patient. To start a superbill, click this icon. indicates the superbill is not yet started for the patient. To start a superbill, click this icon. |
| • | The icon  indicates the superbill is already started for the patient. Click this icon to view or modify the existing details of a superbill. indicates the superbill is already started for the patient. Click this icon to view or modify the existing details of a superbill. |
| • | To open the 1500 form in the PDF format, click the icon  . You can take a print out of this form for the record purpose. . You can take a print out of this form for the record purpose. |
| • | To view claim details, click the info icon .png) . . |
| • | To view claim history, click the icon  . . |