Practice users can book appointments for patients from the Scheduler screen. To schedule an appointment, click on the appointment time slot you want to schedule.
This will take you to the Book Appointment screen, where you can book an appointment.
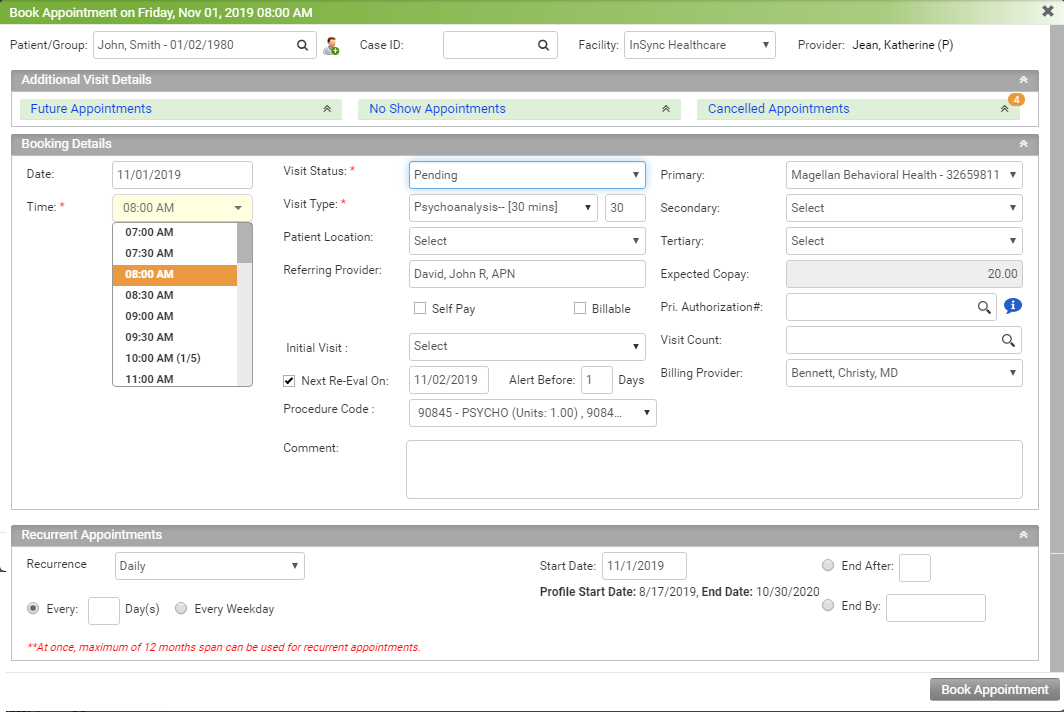
To book an appointment:
| 1. | Start typing the patient name and select the Patient name using the smart search results. Users can also use Case ID in case of booking appointment based on case number. |
| 2. | By default, the logged in facility appears in the Facility drop down list. If you want to change the facility, you can select it from the list as per your requirement. |
| 3. | Select the Visit Status from the drop-down list. |
| Note: Most practitioners select either “Pending” or “Confirm” to indicate a booked appointment, depending on practice preference. If entering a walk-in appointment, however, the user may choose to select “Check In”. |
| 4. | Select the Visit Type (e.g., New Patient, Follow-up, Consultation, and so on). |
| Note: Visit types are fully customizable and are configured from Scheduler Setup screen. |
| 5. | Select the Patient Location (i.e., room the patient will be seen in). |
| Note: Patient Locations are fully customizable and are configured during the Implementation process. |
| 6. | Enter the authorization number using smart search. You can also configure the authorization number, if the authorization is not configured. You can also view the expired or inactive authorizations by clicking the red icon  next next to the Authorization field. next next to the Authorization field. |
| 7. | To make this appointment a Recurring Appointment, select the “Recurrence Appointment” check box. The check box is made available only when the Visit Status is either “Pending” or “Confirm.” Please refer to the Recurring Appointments for additional information on this type of appointment. |
| 8. | When booking an appointment next time for the same visit type, you can select the parent visit from the ‘Initial Visit’ drop down. You can also select the Next Re-Eval date for this visit if you wish to have a next re-evaluation in future. |
| 9. | Add any Comments to the appointment using the free-form text box. |
| 10. | Click the Book Appointment button. You can now view this appointment on the Scheduler for the selected date. |
| 11. | Click the Add Additional Appointment(s) button to book a patient's appointment for multiple provider at once. Once all desired appointments are added for the same patient you can then click the ‘Book Appointment’ button to book all of them at once. |