Once batch is created and one or more EOBs are added to the batch, you can add claims to each EOB to post payment. This allows you posting payments for multiple claims of multiple EOBs at single time.
To add claims to EOBs:
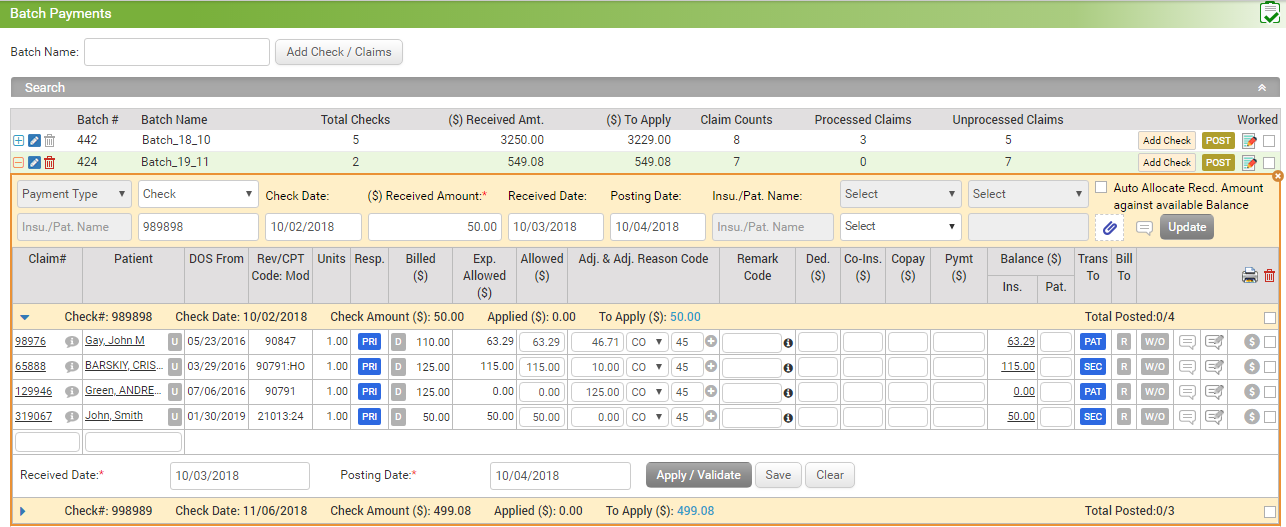
| 1. | From the left menu items, select Billing > Batch Payments. |
| 2. | Search the desired batch to which you want to add claims. |
| 3. | To expand the list of EOBs, click the  icon. icon. |
| 4. | To add claims to EOB, click the  icon present at the end of the row in grid. icon present at the end of the row in grid. |
| 5. | Enter claim number in Claim# field and select the required claim from smart search results. Once you have selected the required claim, other details will appear automatically in the respective fields. (For e.g., Patient, DOS From, Revenue/CPT Code, Units, Responsibility, Billed Amount, Exp. Allowed, Allowed Amount, Adj. & Adj. Reason Code, Remark Code, etc.) |
| o | The Allowed field at a line item level will be enabled only when the payment is for primary payer and any payment is not yet done. |
| o | Enter the Adjustment and Payment amount. The Adjustment field will allow to post Negative amount. It will be considered as a debit adjustment. |
Note: When the payment box is in orange color, it implies that excess payment is received and hover over the amount will show the excess payment received until it is not marked as worked from the check box.
| 6. | Click this icon  to view previous payment details for that line item. to view previous payment details for that line item. |
| 7. | Click this icon  to apply unapplied credit for that claim. to apply unapplied credit for that claim. |
| 8. | Click this icon  to post denial for that claim. Denial can be posted at a line item level. to post denial for that claim. Denial can be posted at a line item level. |
| o |  - Indicates that line item payment is posted, but not as denial. - Indicates that line item payment is posted, but not as denial. |
| o |  - Indicates that line item payment is posted as denial. - Indicates that line item payment is posted as denial. |
| o |  - Indicates that line item payment is not posted. - Indicates that line item payment is not posted. |
| 9. | Click the Rebill icon  to rebill that claim. to rebill that claim. |
| 10. | Click the Write-off icon  to write-off that claim by choosing appropriate write off reason from the drop-down. to write-off that claim by choosing appropriate write off reason from the drop-down. |
| 11. | Click the Notes icon  to enter notes pertaining to the claim, if any. to enter notes pertaining to the claim, if any. |
| 12. | Click this icon  to add note in patient statement. to add note in patient statement. |
| 13. | Click the Post Payment icon  to post the payment for that claim. to post the payment for that claim. |
| 14. | Click the Printer icon  to print the selected claims details. to print the selected claims details. |
| 15. | Click the Delete icon  to delete the selected claims. to delete the selected claims. |
| 16. | To validate the payment details, click Apply/Validate. |
| 17. | To post payments and save the details, click Save. |